HOW TO
The “How-to” page is where you will find all sorts of helpful information about your new website.
How-To Table of Contents
Pages
- From the Dashboard left-side menu, click ‘Pages’ (This will allow you to view all Pages that are currently built.)
- If you want to build a new page, select ‘Add New’
- On new pages ‘Enter title here’. Upon saving the draft or publishing the page a URL will be auto-generated based upon what is entered into the “Enter Title” field. To change, click the Edit button that appears under field.
- If applicable, set the parent page under Page Attributes (in the right column.) This will set the url structure but NOT the visual display of subpages in the site navigation.
- Under ‘Additional Page Content‘ you can add the Title (this will override the page name and be the page h1) and Content (include h2 that will appear larger and any needed body copy.)
- The h1 for the page defaults to the page title, the Title here will overwrite this.
- Include h2 that will appear larger and any needed body copy that will appear in the header area.
- If applicable, add a Featured Image (in the right column). This image will appear large in the header area (see Page Blocks page for example).
- If applicable, enter content into wysiwyg editor (instructions below). Most of your pages will use the page blocks to layout content.
- Enter SEO information in the Yoast SEO settings. (You will need to add a Meta Title/Meta Description.)
- Select any page blocks to join to the page by clicking name in the left window of Page Blocks box. Anything on the right will appear on the front end. (See Page Blocks section for details on how to build Page Blocks.)
- Click and drag to reorder. Click (-) to remove from page.
- Note: Page blocks need to be created before they can be joined to the page.
- Save as Draft, Publish (or Update to save edits) the page block to save it.
- Remember, published page blocks will not be visible on a page until it has be Joined to that page.
Content Editor (WYSIWYG)
- Type content directly into the wysiwyg editor or copy/paste from word processor with ease.
- When copying/pasting, ALWAYS use the ‘clear formatting’ button (small eraser icon) after pasting, and/or ‘paste as plain text’ (T on clipboard icon) before pasting.
- Use special characters button (Ω) to replace any special characters from pasted content. If not, the coding may be different.
- To add a fine horizontal line across the content space click on the ‘horizontal line’ icon (—).
Font Styles
- Different font and header styles are preloaded in the (Paragraph) drop-down menu and are labeled (Header 1, Header 2, etc.) Please see the Content Styles page for reference to your site’s font styles.
- Highlight the text and then select the desired font style
- Add ‘Intro‘ text styling by highlighting text and going to Format > Formats > Intro.
- Add small text ‘Subtext‘ styling for the captions by highlighting text and going to Format > Formats > subtext.
Block Quotes (in Content Editor)
- Highlight text to be put into block quotes.
- Select block quote button (“) next to the Italics.
Links and Buttons
- Highlight the word/s which you want to create as a link and clicking on the insert/edit link icon.
- Enter the destination URL directly into the field or performing search by beginning to type in the internal page or post you want to link to.
- For internal links, you can also insert the page url after your domain name. IE: www.website.com/about would be: ( /about). Click the blue arrow ‘Apply’ button.
- For external links, insert the entire url (http://www.website.com). To open external links (or anything else) in a new tab click on the ‘gear’ icon to get more link options. In the popup window click “Open in a New Tab”. Click the blue arrow ‘Apply’ button.
- For telephone “click to call” functionality add “tel:” followed by the phone number (tel:8885551234).
- For email links add “mailto:” followed by the email address (mailto:[email protected])
- To break a link, click on the link and then click the ‘Remove Link’ button (broken chain icon).
- To make a link into a button, highlight the link and in the Format > Formats select ‘button/ button reverse/ text button’.
Inline Images
- To add an inline image, place your cursor on the area where the image should appear, and click ‘Add Media‘ button above wysiwyg.
- Select image or search using field in top right corner, select it, then click blue ‘Insert Into Page‘ button.
- You can also Upload a new file from your computer. Note: Images should be edited and cropped to the correct pixel dimensions before uploading. Jpgs and Pngs should be 72dpi. To keep page load times low we generally recommend that images be less than 250mb.
- Once the image is in place, click on image to reveal edit toolbar. Choose an alignment and click on the ‘edit’ pencil icon to control other setting such as link options.
SEO Settings
- Yoast SEO tab will automatically pull the page name and beginning content on the page as your Meta Title and Descriptions. Overriding these will allow you to control what text (and keywords) search engines will see here.
- Enter Title tags (max. 70 characters)
- Enter Meta Description (max. 140 characters)
- Social tab – These fields can be used to custom set the information that will display on social media when the page, post, etc is shared on social media. Mostly used for any pages, post, resources that will be shared on social media.
- Enter Title
- Enter Description
- Upload Image
Page Attributes
Underneath the publishing tools at the top right is Page Attributes. This is where you can assign a page to a parent page.
- If you assign a page to a parent page it will change the url structure of the page.
- If ‘new page’ is assigned to ‘old page’, its url will change to old-page/new-page
- You can set the order of pages in the visual navigation in Appearance > Menus. (directions below)
Page Blocks
Page Blocks are created separately from pages, and then joined to the desired page(s). They do not appear on your site unless they are assigned to a page. You can either assign pages from the page block backend, or, from the page backend you can join created page blocks.
All Page Blocks
- To view/edit existing page blocks, in the dashboard left menu, click Page Blocks/All Page Blocks. This will allow you to view all Page Blocks that are currently built.
- From a page, you can also click on the “Edit” red button that appears in the upper right corner of each page block (you must be logged into WordPress) to edit that specific block.
- Existing page blocks can be “Cloned” or “Copied to a New Draft” but you MUST rename and change the joined pages or duplicates will appear on those pages.
- Page blocks may be used on multiple pages exactly as they are created (you may consider naming these starting with “Global”). Keep in mind that any edits made to this page block will be reflected across all occurrences of this block.
Add New
-
- To create new page blocks, in the dashboard left menu, click Page Blocks > Add New. You can also click “Add New” from the top of the All Page Blocks view.
- “Enter title here”
- Note: unlike page titles, this title is not associated with SEO in anyway.
- You will want to name it intuitively, such as starting with the name of the page this block will be joined to, followed by the block layout, and perhaps the beginning content of the block. This will make it easier to find to edit later. Example: “About – 5050 Our History”
- Select your desired Layout: Full Width, Call to Action, Two Column, Two Column Tabbed, Product Detail, Product, Contact
- Follow more detailed instructions on Page Blocks Layout Options page for each specific layout option.
- Join this page block to specific page(s) here. Note: This page block will appear at the bottom of that page. If needed, you will have to go to back of the page to rearrange the order of the blocks.
- Save as Draft, Publish (or Update to save an edit) the page block to save it. Remember, even published page blocks will not be visible on a page until it has be Joined to that page.
Page Block Layout Options
- Full Width – Text / Testimonial / Ads
- Two Column – Text, Video, Image, Gallery, Testimonial Combinations
- Four Column Block – Text ONLY
- Full Width – Courses
- Full Width – Upcoming Courses
- Full Width – Resources
- Full Width – Instructor
Custom Post Types:
Courses
-
- These are built very similar to pages, but have a slightly different layout and required fields.
-
- The text at the top of the Course Landing page is managed in Courses > Courses Archive.
- In left menu, click Courses (This will allow you to view a listing of all created course.)
- Courses also has three taxonomies, Topics, Course Level, and Methods. These will be used for filtering on the landing page but you can go here to view all, add new, or edit.
- To add a new course, go to Courses > Add New (you can also do this from the All page.)
- On the new Courses detail page, name the course (this will feed to the landing page and Courses page blocks).
- On the right hand side, select and relevant Topics, Course leverls
- Enter any content in the wysiwyg that you want to appear on the top right side of the detail page. (“Overview” will automatically appear here. No need to put in the wysiwyg.)
- Course details: If you do not enter any text here, the field name will not appear.
- Date, Time, Location Credit
- Price: You can add additional lines of text with the red “Add Row” button.
- CTA: Select Enroll Now or Check Availability. These terms will pull through to the cards on the Course block and the landing page
- Enroll Now requires a link to the Infusionsoft for page. You can customize the button text and external linking option in the link window.
- Check Availability requires the embed code for the the infusionsoft form for the email signup.
- Excerpt: Add short text that will pull to the Courses Cards.
- Additional Page Content > Title (this will override the page name and be the page h1)
- Select any page blocks to join to the page by clicking name in the left window of Page Blocks box. Anything on the right will appear on the front end. (See Page Blocks section for details on how to build Page Blocks.)
- Click and drag to reorder. Click (-) to remove from page.
- Note: Page blocks need to be created before they can be joined to the page.
- REGISTRATION BUTTON
- In the Form field, Copy and Paste this HTML into this field:
<a class=”button-cta” href=”https://xp141.infusionsoft.com/app/manageCart/processBundle?clearCart=true&productId=172&productQuantity=1&styleThemeId=120″ rel=”noopener”>Register for this Course</a> - Change the URL in the href between the quotes to match the URL provided by Infusionsoft.
- In the Form field, Copy and Paste this HTML into this field:
- INFUSIONSOFT FORM
- In the Form field, Copy and Paste the unstyled HTML provided by Infusionsoft into this field.
- Set any Yoast SEO meta information as you would on a basic page.
- Publish, Update or Save as a Draft.
-
Resources
-
-
- These are built very similar to pages, but have a slightly different layout and required fields.
-
- The text at the top of the Course Landing page is managed in Courses > Courses Archive.
- In left menu, click Resources (This will allow you to view all existing resources.)
- Resources also has three taxonomies, Type, Topic, and Jurisdiction. These will be used for filtering on the landing page but you can go here to view all, add new, or edit.
- The Topic taxonomy has a short description that pulls through to the Resources page blocks. You will need to add this for all Topics.
- To add a new course, go to Resources > Add New (you can also do this from the All page.)
- On the new Resource detail page, name the course (this will feed to the landing page and Additional Resource cards that can be added at the bottom of these pages).
- On the right hand side, select and relevant Types, Topics, and Jurisdictions by typing them into the field. (They will begin to autofill if they exist.)
- WHITE PAPER – You must first select this type to get the correct page layout for white papers. Once selected, additional fields will be available (below the “Related Resources” join) to fill in.
- Add the thumbnail image of the resource
- Replace the download ID for the resource in the field for the resource you want to ‘gate’. The Download setting needs to be done separately to get this ID number. (See below for specific instructions on this.)
- Enter any content in the wysiwyg that you want to appear at the top of the detail page.
- Additional Page Content > Title (this will override the page name and be the page h1)
- Excerpt: Add short text that will pull to the Resource Cards.
- Set any Yoast SEO meta information as you would on a basic page.
- NOTE: you cannot select resources pages from the page blocks page. You MUST join the page blocks from this Resource page.
Select any page blocks to join to the page by clicking name in the left window of Page Blocks box. Anything on the right will appear on the front end. (See Page Blocks section for details on how to build Page Blocks.) NOTE: you cannot select resources pages from the page blocks page. You MUST join the page blocks from this Resource page.- Click and drag to reorder. Click (-) to remove from page.
- Note: Page blocks need to be created before they can be joined to the page.
- Publish or Save as a Draft.
-
-
Jurisdiction
-
-
-
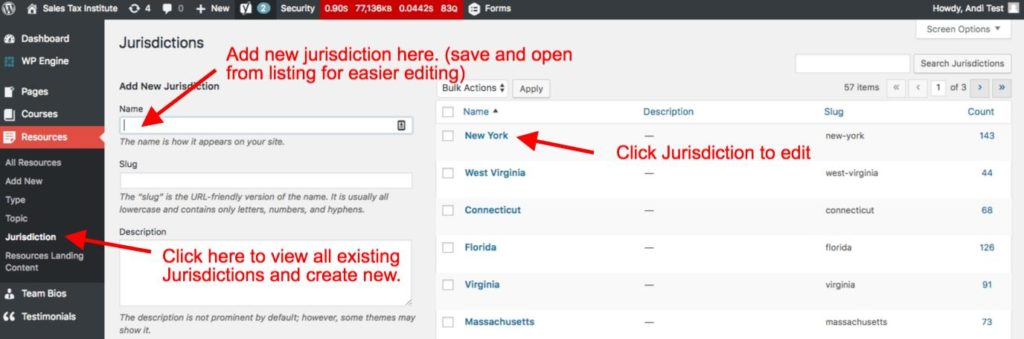
- Go to Resources > Jurisdiction in the dashboard left menu.
- Click on the state you’d like to edit. (Alabama and Washington are set up as examples.)
- New Jurisdictions can be added in the left column. (For easier viewing name and save the jurisdiction and then open from the listing on the right.)
- Do NOT enter description text in the first description field, use the second (full wysiwyg).
-
-
Amnesty
-
-
-
- State Amnesty Web Page – Enter url link and text and set to open in a new tab (if linking externally)
- Enter field text for Status, Amnesty Filing Dates, Amnesty Inclusion Periods.
- Tax Types and Conditions – enter content in full wysiwyg
- Add additional Amnesty Charts with the red “Add Row“
-
-
Remote Seller Nexus Chart
-
-
-
- Enter wysiwyg content (allows for stylings and linking)) for Click-through Nexus, Affiliate Nexus, Reporting Requirements, Economic Nexus.
- Internal links can open directly, but remember to set external links to open in a new tab.
- Enter wysiwyg content (allows for stylings and linking)) for Click-through Nexus, Affiliate Nexus, Reporting Requirements, Economic Nexus.
-
-
Sales Tax Holidays
-
-
-
- Enter field text for Holiday Type and Holiday Dates.
- Enter wysiwyg content (allows for stylings and linking)) for Holiday Description.
- Add additional Holiday Charts with the red “Add Row“
-
-
Rates
-
-
-
- Enter field text for State Rate, Range of Local Rates, & Local Rates Apply to Use Tax.
-
-
White Papers Gated Downloads
See Detailed Instructions on this page.
Team Bios
-
-
-
- In left menu, click Team Bios (This will allow you to view all existing bios.)
- To add a new bio, go to Team Bios > Add New (you can also do this from the All page.)
- Name the Bio detail page with the Instructors Name. (this will feed to the instructor page block and team landing page.)
- Enter Position title.
- Add a Bio Image from the media library. (You can also upload a new image here.)
- Add Social Media links with icons and links. Email can also be added as a link.
- Enter a Short Description, this will pull to the Instructor page block.) c
- Enter any content for the detail page in the wysiwyg.
- Set any specific Yoast SEO meta information as you would on a basic page.
- Select any page blocks to join to the page by clicking name in the left window of Page Blocks box. Anything on the right will appear on the front end. (See Page Blocks section for details on how to build Page Blocks.)
- Click and drag to reorder. Click (-) to remove from page.
- Note: Page blocks need to be created before they can be joined to the page.
- Publish, Update, or Save as a Draft.
-
-
Testimonials
-
-
-
- In left menu, click Testimonials (This will allow you to view all Testimonials pages that are currently built.)
- If you want to build a new testimonial, select Add New.
- Enter Customer’s Name as the title of the testimonial, this will feed to the testimonial block.
- Enter testimonial content in the wysiwyg.
- Byline: enter clients position/company.
- Enter Video URL and Overlay Image, or add Testimonial Image if no video is available. If neither is added the testimonial text will appear full-width.
- When adding videos, be sure that the url is for the video on it’s own, not the playlist url.
- Open the url for the video. If the video is in a playlist, click on the “Share” button (has an curved arrow image) below the video.
- Copy and paste that url in the browser, this will redirect to the full/complete url.
- Use this new url to paste into the site.
- Publish or Update the testimonial.
-
-
Media Library
-
-
-
- To view the Media Library click Media in the dashboard menu. (You can also go directly to the ‘Add New’ screen from here.
- To ‘Add New’ images/files, click the Add New button at the top of the page. Then drag and drop files into window or click Select Files button.
- You can add files directly to a specific folder, or drag/drop them later.
- Inside the Media ‘Grid’, media items are displayed in a thumbnail grid for ease of navigation. Click any media item to edit the image title, meta data, link options; however, we recommend that you use photo editing software like Photoshop before uploading images to Media Library.
- This is where you can find the unique URL for image and PDF, which can be used to link to ‘Download’ a PDF.
- Media library can be filtered by type or date and is searchable by title.
-
-
Options
-
-
-
- Edit the eNewsletter signup text
- Edit the address in the footer
- Edit the Seals and Certificates in the footer.
- Edit the Social Media links in the footer.
-
-
Menus
Use menus to organize how you want the Primary, Secondary, Footer, Mobile menus to display.
-
-
-
- To add pages to your menus and to structure sub pages, navigate to Appearance > Menus in the left dashboard menu.
- At the top of the page, select the menu you want to edit from the dropdown, or select create a new menu.
- Adding Pages (or post type pages):
- Find the page you wish to add to your menu from the selection area on the left. Select all applicable pages and add to menu.
- Once in the menu, drag and drop the pages to reorder or set as sub pages.
- To set as a subpage, drag the page so it appears indented underneath the primary page.
- The menu label defaults to the name of the page but this can be overwritten. Click the arrow that appears all the way to the right of the page label and enter your title in the ‘navigation label’ field. You can delete menu items in this section as well.
- ‘Save Menu’ with the red button to the right.
- Adding ‘Custom Links‘ such as a phone number or external site page.
- To add a custom link to your menu, select ‘custom link’ from the left options area and ‘Add to Menu’.
- Add the URL and Navigation Label you want to display.
- ‘Save Menu’ with the red button to the right.
-
-
Widgets
This is a ‘three-step’ process. 1. Creating the sidebar widget content. 2. Creating the space on the page for the widget. 3. Joining the widget to that page.
-
-
-
- In the dashboard menu go to OMS Widgets > Add New. (you can view all existing widgets here)
- Name and add the new content for that specific sidebar. You have options for open content, image, video, map. Choose the correct item, and complete the entry.
- In Appearance > Widget Areas, create (Add New) and label a new widget area and assign it to the relevant page(s) with the check box fields below. This will create a sidebar widget area on the desired pages, like the content styles page. NOTE: if they page already has a Widget Area created, you can skip this step.)
- Once the area is created go to Appearance > Widgets, select the widget area you created from the list on the right (newly created areas will appear at the top).
- Click and drag the OMS Persistent Widget tab from the options on the left into the desired “area” on the right.
- Click the drop down on the OMS Persistent Widgets and choose the entry you completed in OMS Widgets.
- If you are adding more than one sidebar element such as text, an image, etc., you only need to create one sidebar widget area.
- You have to drag/drop the OMS Persistent widget into the sidebar multiple times until all of your items have been added. Continue to select the different widget sections from the drop down menu. If you want to reorder them, just drag and drop!
- In the dashboard menu go to OMS Widgets > Add New. (you can view all existing widgets here)
-
-
Forms
New Forms
-
-
-
- To create a new form, select Forms from the left navigation.
- Select Add New or duplicate and existing form.
- If you want to “download protect” each download with a unique form you will need to create a new form each time.
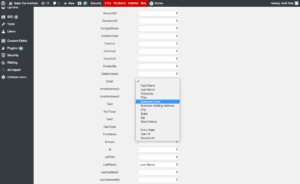
- On the right side of the screen are all of the form fields that are available to you. Click to add to the form on the left.
- Once added, clicking on the form field to edit the field options. (title, appearance, required, etc.)
- Next select the “Settings” tab to edit the settings, confirmations, and notifications.
- Once the form is complete, publish your form.
- To add a form to a page just click on the ‘Add Form’ button at the top of the wysiwyg editor and select desired form. Short code will appear in the wysiwyg, but the actual form will appear on the page.
-
-
Editing Existing Forms
-
-
-
- To edit the existing form select Forms from the left navigation.
- Select form to be edited.
- Click on the field you want to edit to open editing options
- Each field in the form has a ‘Required Field’ check box in these options.
- To add new fields click on the desired field from the list on the right side. Once added to the bottom of the form these reordered by drag and drop.
- Once the form is complete, update your form. The form will automatically update on the pages that have the short code for this form.
-
-
Mapping Gravity Form to Infusionsoft – You must first create the form in Forms before linking fields between the two.
-
-
-
- In the left menu hover over Forms and click on Infusionsoft.
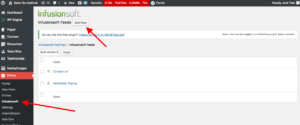
- Click Add New, and select the Form you want to map to Infusionsoft.
- Some fields may automatically align and fill to the correct Infusionsoft tag.
- For the ones that do not align you can choose from the dropdown which Gravity Form field you want to map to this Infusionsoft field.
- Note: You may want to have initial Gravity Form open to make sure all fields are accounted for.
- Note: You may want to have initial Gravity Form open to make sure all fields are accounted for.
- Save Feed by clicking on the red button at the bottom.
- In the left menu hover over Forms and click on Infusionsoft.
-
-
Countdown Plugin
-
-
- In the left Menu click on Waiting
- Click on the red “Add New” button. (NOTE: You may want to open Waiting in two tabs, one to display the Demo we’ve created so that you can replicate the same stylings. Unfortunately, duplicating is not an option.)
- Don’t forget the edit the Style tab to match the design to other existing Countdowns. (NOTE: You may want to open Waiting in two tabs, one to display the Demo we’ve created so that you can replicate the same stylings. Unfortunately, duplicating is not an option.)
- Save the countdown. Upon saving the shortcode to copy/paste into your wysiwyg will appear.
-